Unpacking the theme
Before installing the theme, please make sure you unpacked the archive and extracted the theme files. The main package contains archives with the main theme, child theme, documentation.
Uploading the Theme
There are 2 ways to install the theme:
- via FTP:
- Log into your web server with FTP client software.
- Unzip the
fcunited.zipfile and ONLY use the extracted/fcunitedtheme folder. - Upload the extracted
fcunitedtheme folder into/wp-content/themes. - Navigate to the Appearance > Themes tab and activate the theme.
- via WordPress admin panel:
- Log into the WordPress admin panel.
- Navigate to Appearance > Themes and click on Add New and Upload Theme.
- Select the
fcunited.zipfolder and click Install Now button. - After the successful installation, click on Activate or navigate to the Appearance > Themes and click on Activate button to activate the newly installed theme.
- Install and activate ThemeREX Addons plug-in.
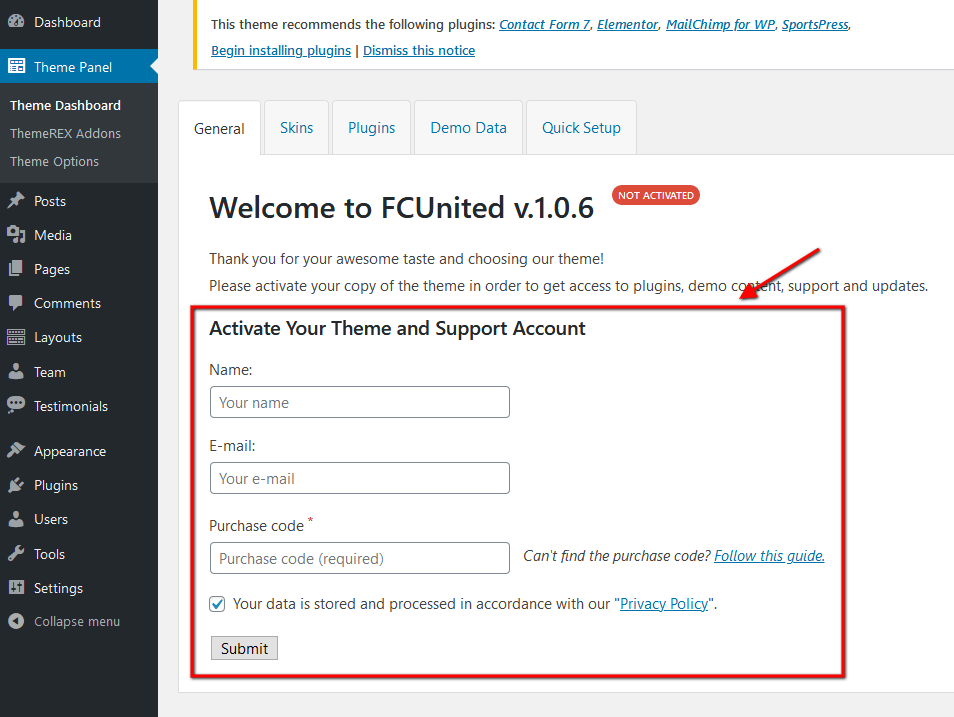
- Enter your Purchase Code and some personal information. Theme activation allows you to get access to plug-ins, demo content, skins, support and updates. To get the code, please navigate to your ThemeForest “Downloads” page and click on the theme download link. Check this guide for more details.

IMPORTANT! The number of theme activations (with purchase code) is LIMITED! Anyway, you are allowed to activate your theme locally or on the dev server and then move the theme to the main domain. Please feel free to contact our support department if any issues arise.
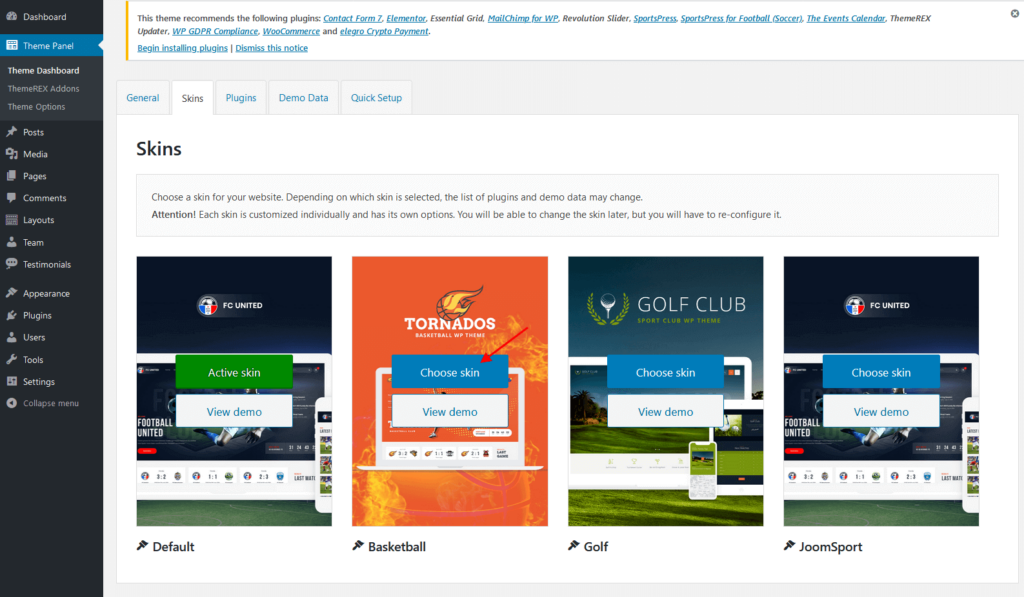
7. FC United archive contains 4 themes (skins) in one package that differ in design only. In “Theme Panel > Theme Dashboard > Skins” section select the skin and click on the “Choose skin” button. Depending on the skin selected, the list of plug-ins and demo data may vary.

OPTIONAL: If you want to make changes in theme’s templates or functions, we strongly recommend activating a child theme before demo data installation.
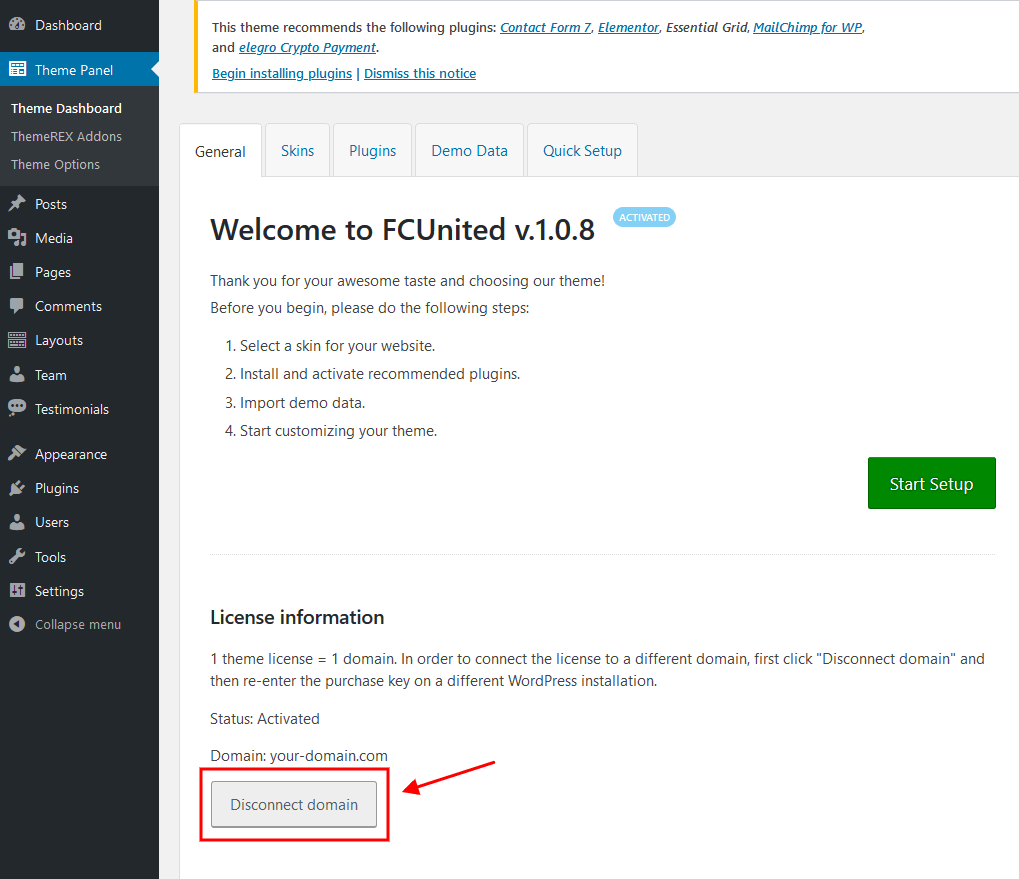
The theme license allows you to install the theme on ONE domain only! In order to connect the license to a different domain, first click “Disconnect domain” (Theme Panel > Theme Dashboard > General) and then re-enter the purchase key on a different WordPress installation. If you have any questions, please contact our support department.

!!! Before any manipulations that will require re-entering the purchase key even on the same domain (e.g: WordPress reinstallation or cleaning the database), please FIRST disconnect the domain!
Plugins Installation
Below is the list of the plug-ins that come included into the theme.
Some of these plug-ins can also be installed from the WordPress.org repository.
- Contact Form 7
- Elegro Crypto Payment (available for Default, Basketball and Golf Skins)
- Elementor (required)
- Essential Grid
- JoomSport (free version) (required) (available for JoomSport Skin)
- MailChimp for WordPress
- Slider Revolution
- SportsPress (free version) (required) (available for Default, Basketball and Golf Skins)
- SportsPress for Basketball (required) (available for Basketball Skin)
- SportsPress for Football (Soccer) (required) (available for Default Skin)
- SportsPress for Golf (required) (available for Golf Skin)
- The Events Calendar (available for Default, Basketball and Golf Skins)
- ThemeREX Addons (required)
- ThemeREX Socials
- ThemeREX Updater
- WooCommerce (available for Default, Basketball and Golf Skins)
- WP GDPR Compliance
You can find a detailed overview of each plug-in in the Plug-ins section of this documentation file.
There is only one required plug-in for proper theme functioning, and that is ThemeREX Addons. The rest of the plug-ins are recommended for installation, but not required.
To make the theme look exactly as on the demo page, you would need to install the recommended plug-ins:
- After the installation/activation of ThemeREX Addons plug-in and theme activation, you will see a prompt with a list of plug-ins to install. Click on the Begin installing plugins link or go to Appearance > Install Plugins.
- Check the plug-ins you want to install, select the Install option and click Apply. Installation may take a few minutes, please be patient and do not refresh the page.
- Now, activate the plug-ins. Go to Appearance > Install Plugins, check all the listed plug-ins, choose Activate option and click Apply.
In case you are running a shared hosting with limited resources (e.g. GoDaddy), we do recommend enabling only the essential plug-ins (e.g. ThemeREX Addons, Elementor) and disable the rest. Otherwise, it may significantly increase the memory consumption, which might lead to unwanted issues.
PLEASE NOTE! The installation and activation of bundled plug-ins run automatically. Anyway, if you have any issues, please extract plugins.zip archive (from the theme package) and proceed with the plug-ins installation manually.
Demo Content
Our theme includes a simple One-click demo data installation, which allows your site to look exactly as on the theme demo.
Before installing demo data, please make sure you have activated your theme copy (entered the purchase code in the Theme Panel (WP Dashboard) > Theme Dashboard > General tab) and installed all the required plug-ins. Check the Plug-ins installation section for more information about the required plug-ins.
In case you do not have your Purchase Code, please navigate to your ThemeForest “Downloads” page and click on the theme download link. Check this guide for more details.
IMPORTANT! Our theme supports RTL text direction (for Default skin)! Please FIRST choose the correct language in your WordPress settings (Dashboard > Settings > General > Site Language), then proceeding with the demo data installation.
In order to import the demo content go to Theme Panel (WP Dashboard) > Theme Dashboard > Demo Data.

On the page that showed up set the required parameters.
Partial Import
When choosing the partial demo data import, the new content will be added to your existing data.
Although this will not overwrite your existing content, we still recommend backing up your website before doing this.
Note, that the pages are imported without the original images. Instead, the image placeholders are used. This is done to keep your existing content intact.
Import separate pages means that you receive the page structured like on our demo, just widgets set that requires further customization: you should replace demo categories/post ids with your own ones.
Full Import
When choosing this option, all the existing content of your website will be lost and replaced with the new data. We recommend using this option for new WordPress installations only.
Use the full import option if you want to have an exact copy of the theme demo. It enables you to import all media files, pages, theme options, and plug-in settings.
Some plug-ins increase the memory consumption. For example, BuddyPress and bbPress (not included into the theme’s package) require additional 60-80Mb. If you are having trouble installing the demo data, deactivate massive plug-ins and try again.
In case demo data installation is stuck and you see “Error load data from the file … “ error message, you can manually install it by downloading the demo.zip archive from our server: LTR version or RTL version. Extract the archive to demo/ folder and upload this demo/ folder to wp-content/themes/fcunited directory.
Treat the screenshot below as an example only. The list of folders inside a theme package may vary.
If the issue persists, please contact your hosting service provider to make sure that your server configuration meets the Theme Requirements. Otherwise, please refer your request to our support department.


